
One thing you should know about my other half. He’s not interested in clothes. His favourite saying on the topic of fashion is “function over form”. It’s both endearing and frustrating. So with that attitude you would think that home made garments from the wife would be worn and treated like any other sack with armholes but no, they get subjected to a much more stringent set of rules and very few of my offerings have ever made it into rotation. So these days I generally stick to sewing for myself but every so often the need to clothe my beloved overcomes me… this is that story.

There were 2 reasons I decided to make him indoors a Thread Theory Strathcona henley top:
1) My mother had given him an olive green Henley style top for Christmas that he was wearing to death. (Death by lunch all down the front that is) The success of this latest addition boded well for me using the same tactics to stealth elbow myself into his wardrobe and
2) I really wanted something similar for myself. I’d been having a bit of success with the Sinclair Patterns Demi raglan tee and thought once I’d mastered the Henley placket I might be able to hack it onto the Demi.
My original intention was to make him a pure white grandad style top in a lovely weighted John Louden cotton jersey from Fabricate Mirfield; but if I’m completely truthful I wasn’t that upset to discover there wasn’t quite enough of it left after all my Demi experiments Yes I could probably have ignored all the laws of physics and grain lines to squeeze one out, but I’m basically incapable of making a garment in just one colour so decided it needed to have a contrast placket, neckband and cuffs. His nibs agreed to the swap, particularly when I pointed out the Wattle and Slate eff cancer fabric contained secret swear words, and we were off.
And straight away we were into the placket… no gentle warm up sewing with this pattern! Over the last few years I’ve become a fairly experienced sewist of both shirts and knit fabric. This isn’t arrogance talking – I’ve got the wonky collars and overstretched seams to prove it! So I have no excuse for my atrocious lapse in judgement – I clearly read the step about ironing interfacing in the placket and I coldheartedly chose to skip it. After all, it was a fairly stable jersey and I knew what I was doing right?
Stop! If you’re reading this because you’re considering sewing the strathcona – learn from my tragedy! Do. Not. Skip. Interfacing. The. Placket. That is all. (And if you just want the Number 1 Top Tip for the pattern, feel free to skip all the rest of the waffling I’m about to do). I’ll never know. 😀
The first few sewing steps went pretty well… right up to the point where you cut down the middle of your top to push the placket through. At which point I discovered I’d sewn down the wrong side of my lovely contrast fabric. Aargh! Unpicking jersey is a pain in the proverbial at the best of times, let alone after you’ve painstakingly trimmed all your seams down to 1/4 inch, so by the time I’d undone it all then carefully resewed it the right way along the same stitching lines the fabric was already turning into a hot stretched out mess.
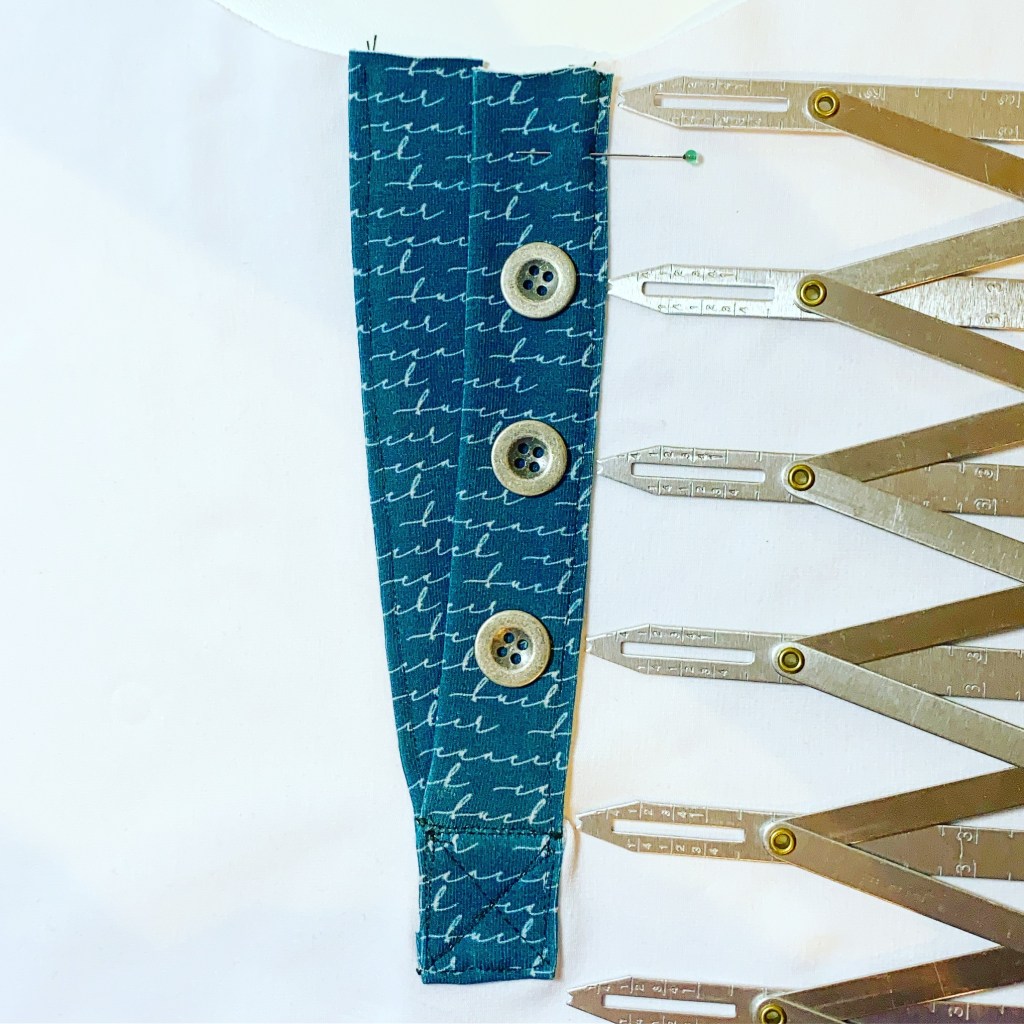
In other patterns with plackets that I’ve sewn, one side is longer than the other to create that cute bit at the bottom with the fancy crossed top stitching on it. The strathcona has it all the same length, then once you’ve stitched down both side of the button bands you cut away a section at the bottom to reduce the bulk. I can see why they did this to simplify the sewing instructions, but it adds a new potential for error.
Top Tip no. 2. Don’t. Cut. Too. Close. To. The. Stitching. You might think you’re making it all nice and tidy, but in reality you’re making it harder to catch and enclose everything when you sew the fancy cross. And you’ll end up unpicking again because the reverse side is a hot sticky mess.
Eventually I coaxed, eased and yanked the placket in place. It’s not the best I’ve ever done and has a little pucker but for something with no interfacing and 2 major unpicks I was happy to let that go. I decided to ask it’s future owner for input on the button choice (and maybe get a bit of congratulations on the progress so far). That’ll teach me to fish for compliments. The heart stopping response was: “I don’t know darling, I’m not sure racing green is really me”. Eek. I panic and resort to bribery: I’ll put one of my super special sweary sewist labels on it if he’ll reserve judgment until he’s at least worn it once.
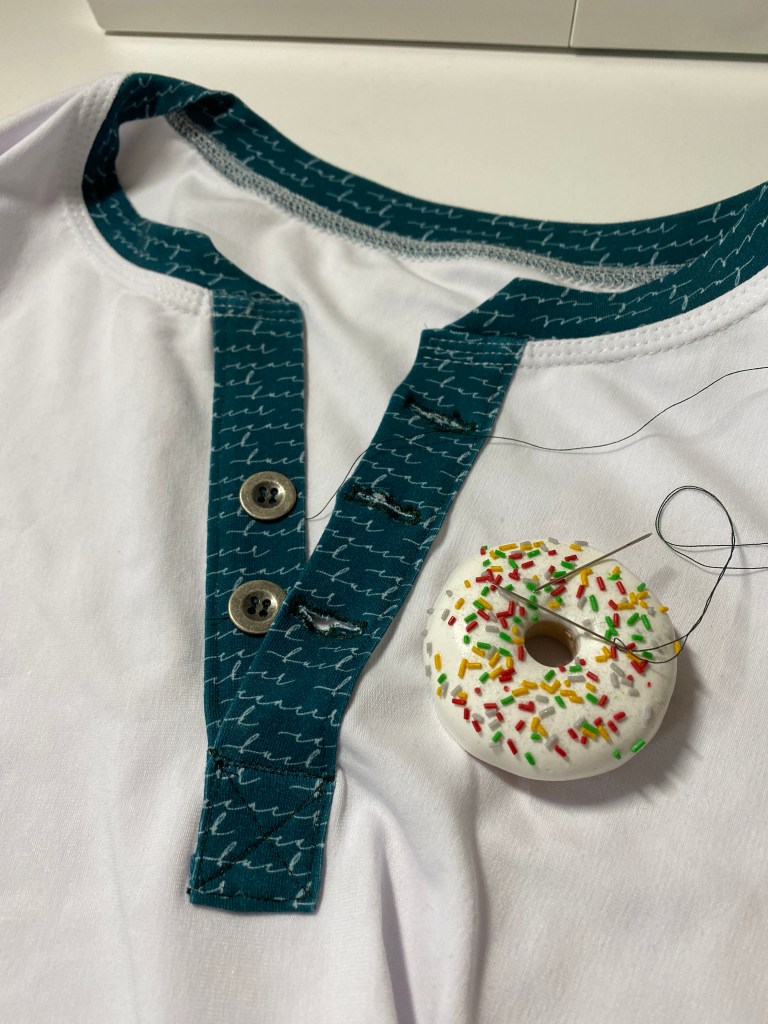
Then I sewed the buttonholes and discovered where the interfacing becomes really important. My supposedly stable fabric got wiggly and bunched all over the place. I went over the dodgy bits afterwards with a narrow zig zag then put on my best salesman voice to tell the husband that good news. I’d taken the edge off the regatta vibe by making the buttonholes… a bit… rustic. More negotiations, the sweary label is now going visibly on the outside.
After the placket, the rest of the sew was as plain sailing as you’d hope from a long sleeved tee. For a stretch top, the set in sleeves required slightly more easing around the sleeve cap than most designers bother with. I could see that causing a beginner a few puckers (Top Tip no. 3 – roll the fabric over your thumb as you pin the sleeves) but it does make for a nice hang over the shoulders.

I used my coverstitch machine on the neckband and bottom hem. After a couple of years of glaring across the sewing room at each other we’re slowly reconciling our differences. And I do love the reverse stitch effect, so used that on the bottom for some added grandad chic.
Then came the nervous unveiling and trying on time. The contrast collar in its full glory passed and it was grudgingly admitted that I probably had known what I was doing with that suspicious racing green idea. (Phew!) Then we hit another snag. “You can see my nipples through it!” “No you can’t” (slight lie and I had my fingers crossed between by back as I said it as yes in fact you could). The top is a slim fit and when he pulled it down to hang straight there was indeed some visible definition of the torso. But we figured out that the top will ride naturally slightly up the hips with wearing and feed more fabric into the headlamps area. Crisis at the 11th hour averted.
And there you have it! Top is finished, hubby looks gratifyingly good in it and might actually wear this one. My nerves are in shreds, but on the bright side I now know all the mistakes to not make on my own Henley top.., watch this space for it!


Nice post! I found it because I am a) A beginner b) With sleeve puckers (well one) and c) Didn’t know if I was doing something wrong with this pattern as the sleeve seemed to big for the armhole.
At least I am only doing the plain T – no plackets for this one. Baby steps.
Now to look up how to do fitted sleeves for when I try attempt #2
LikeLike